Flooring Installation: Methods and Key Considerations (2026)
April 3, 2026

Oak Anziano engineered wood flooring installed in a Hattan villa home office, with clean alignment and natural light.
Most conversations about flooring focus on the visible decisions: the wood, the finish, the pattern. These are the elements that tend to draw attention. Yet there is a less visible factor that ultimately determines how a floor performs over time: the installation.
The same engineered wood plank, installed correctly in one home and poorly in another, will produce two very different outcomes. One floor will feel solid, quiet, and enduring. The other may creak, shift, or show premature wear long before the material reaches the end of its lifespan. Installation is not a step that follows the decision. It is part of the decision itself.
The Main Flooring Installation Methods and When to Use Them
There are three principal flooring installation methods used for wood and LVT, each suited to different materials, spaces, and project conditions. Understanding the distinction ensures the method aligns with both the floor and the environment.
Floating Flooring Installation
Planks are not fixed to the subfloor but instead connect through a click-lock or tongue-and-groove system, resting on an underlayment to form a continuous surface. This is known as a floating installation.
This method works well in renovation projects and apartments where speed and flexibility matter. It accommodates minor subfloor imperfections and can often be installed over existing surfaces. In high-rise settings, the underlayment also contributes to sound insulation.
The trade-off is movement. Floating floors allow for expansion and contraction, which suits certain environments but can introduce sound or a slight change in feel if not installed carefully.
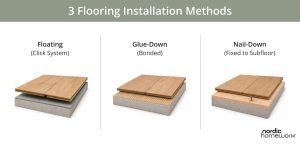
Glue-Down Flooring Installation
This method bonds the flooring directly to the subfloor using a purpose-formulated adhesive. Depending on the material, it can be applied across the full surface or in a controlled pattern, making glue-down installation a precise and stable solution.
It is widely used for engineered wood, LVT, and parquet in both residential and commercial settings. A properly installed glued floor feels more stable underfoot. The difference is noticeable. It reads as solid, consistent, and quiet across the space.
This method depends on a well-prepared subfloor and the correct adhesive system. When both are in place, it delivers a highly stable and durable result.
Nail-Down Flooring Installation
Boards are fixed mechanically through their tongue into a wooden subfloor, defining what is known as nail-down installation. It remains the traditional approach for solid hardwood.
This method is less common in modern residential construction, where concrete subfloors are more typical. As a result, floating and glue-down installation are more widely used in practice.

Floating Fontin LVT flooring in a Downtown Dubai apartment, supporting a clean and minimal interior.
Subfloor Preparation: Where Most Installations Succeed or Fail
If there is a single stage that determines the quality of everything that follows, it is subfloor preparation. This is where the foundation is either established correctly or compromised quietly. It is also where most flooring issues begin.
Before any flooring installation, the subfloor must be:
- Clean
- Structurally sound
- Level within the manufacturer’s tolerance
- Completely dry
Any variation in level must be corrected before installation begins. A subfloor that appears acceptable can still conceal underlying issues, most commonly:
- Structural inconsistency
- Residual moisture
These do not remain hidden. They transfer into the finished floor over time, often in ways that are disruptive and costly to resolve.
Moisture testing on concrete slabs should never be skipped. A surface can appear dry while still holding moisture that affects adhesive performance, causes planks to cup, or compromises the finish.
This is not an edge case. It is a common cause of failure, and it is entirely preventable with proper assessment.

Limetree Valley villa with Oak Nouveau Blonde flooring, precisely installed to ensure a smooth transition into the staircase.
Moisture, Acclimatisation, and Climate Considerations
Moisture and temperature conditions influence how flooring performs from the moment it is installed.
Why Materials Need Time to Adjust
Wood responds to its environment. Before flooring installation, it needs time to acclimatise to the temperature and humidity of the space it will occupy.
For most engineered wood products, this means leaving the unopened boxes in the room for 48 to 72 hours prior to installation. This allows the material to reach equilibrium with its surroundings.
The Impact of Indoor Climate Conditions
Indoor environments are often heavily air-conditioned for extended periods. This creates consistently low humidity conditions that differ from those in which the flooring was manufactured and stored.
Without adequate acclimatisation, the material may continue to adjust after installation. The result can be movement, visible gaps, or stress at the joints. These are not material failures. They are installation oversights.
Why Engineered Wood Performs More Reliably
This is where engineered wood offers a structural advantage. Its multi-layer construction is designed to minimise expansion and contraction caused by changes in humidity.
The result is a floor that performs more consistently over time, particularly in controlled indoor environments.

Chevron Studio Oak AB White flooring installation in a One Za’abeel duplex, maintaining continuity from floor to staircase.
Flooring Layout and Direction in Installation: Why It Matters
The direction in which a floor is laid shapes how a room is perceived. It influences proportion, light, and the relationship between adjoining spaces. This decision is often left until installation, when it should be resolved at the planning stage. Once the floor is installed, it defines the space.
Running planks along the longest wall can make a room feel more expansive. Aligning them with the main source of natural light enhances brightness and depth. In open-plan layouts, direction determines whether spaces feel connected or fragmented. For patterned installations such as chevron or herringbone, precision becomes critical. The starting point and centre line must be carefully set so the pattern remains balanced across the room. When planned correctly, the floor works with the architecture rather than against it.
Choosing the Right Installation Method for Your Space
The installation method should reflect the specific demands of the space. Several factors work together to determine what will perform best over time.
In practice, the space itself often sets the direction:
- Large, open-plan residential spaces typically benefit from glue-down installation. It provides the solidity and acoustic control that these layouts require over time.
- Apartment renovations often favour floating installation, where speed, flexibility, and underfloor acoustic performance are priorities.
- Commercial environments such as offices or retail spaces usually require the durability and surface stability of a glue-down approach, particularly under consistent foot traffic.
The flooring material also plays a defining role. Some LVT products are designed exclusively for floating installation, while certain engineered wood collections perform best when glued.
Following manufacturer guidance is not optional. It directly affects both warranty validity and long-term performance. The method should follow the space, not the other way around.

Illusion LVT plank flooring installation in the eba showroom Riyadh, creating a warm and continuous finish across the space.
Common Installation Mistakes to Avoid
Most installation problems are not the result of bad luck. They are the result of skipped steps. Almost all of them are preventable.
The most common issues tend to fall into a few predictable areas:
- Insufficient expansion gaps: Often seen in floating installations, this can lead to buckling as the floor responds to changes in humidity.
- Incomplete preparation: Creates movement, noise, or adhesive failure over time.
- Incorrect adhesive selection: Using a product not specified for the material can compromise both bond and finish.
- Inadequate acclimatisation: Allows the flooring to continue adjusting after installation, resulting in gaps or stress at the joints.
Each of these follows the same pattern. A shortcut taken early becomes a problem that is far more difficult and costly to resolve later.
Why Execution Defines the Outcome
There is a meaningful difference between a floor that has been installed and one that has been installed well. The tools, the preparation, and the attention given to transitions, perimeter detailing, and pattern alignment are not details that can be improvised on site.
For engineered wood and LVT, the installation team is as important as the material itself. Long-term performance and visual impact both depend on the precision of the work. A well-installed floor on a modest budget will often outperform a premium material laid without the same level of care.
The difference is visible. It appears in the symmetry of a herringbone pattern, in the consistency of transitions between spaces, and in the solidity felt underfoot across an open room.
Before Installation Begins
The outcome is largely determined before any installation begins, with a few key conditions needing to be in place:
- The subfloor has been assessed, levelled, and tested for moisture
- The installation method aligns with the material and the space
- The flooring has acclimatised on site
- The layout direction has been planned
- The installation team has relevant experience with the material

Fusion Chevron LVT flooring installation in an Al Barsha villa bedroom, maintaining a warm and consistent pattern.
Installation as Part of the Decision
A well-chosen floor sets the potential. A well-executed installation is what realises it. They are part of the same process, and both require the same level of attention.
The material defines how a space can look and feel. Installation determines how that potential performs over time, in daily use, and under changing conditions.
When both are considered from the outset, the result is not only a floor that looks right on completion, but one that continues to perform as intended long after installation.
Key Takeaways
A well-performing floor depends on decisions made before and during installation, not just the material selected.
- Small oversights early in the process often lead to long-term issues such as movement, noise, or premature wear.
- Conditions on site, including subfloor level, moisture, and indoor climate, directly influence how the floor settles and performs.
- Each installation method serves a specific purpose, and choosing appropriately ensures the floor remains stable and consistent over time.

Warm Regards,
Pauline Madani
Founder & Managing Director Nordic Homeworx
Frequently Asked Questions
Which flooring installation method is best?
▼No single method is best in all cases. The right flooring installation method depends on the material, the subfloor condition, and how the space is used. Glue-down installation offers greater stability and acoustic control, while floating installation provides flexibility and faster installation.
Do different flooring materials require different installation methods?
▼Yes. The installation method is often determined by the material. Some LVT products are designed for floating installation, while certain engineered wood floors perform best when glued. Solid hardwood typically requires nail-down installation where a timber subfloor is available.
How long does flooring installation typically take?
▼The duration depends on the size of the space, the subfloor condition, and the installation method. Smaller areas may be completed within a day, while larger or more complex projects can take several days. Preparation and acclimatisation should also be factored in.
Can flooring be installed over existing floors?
▼In some cases, flooring can be installed over an existing surface if it is stable, level, and free from moisture issues. Floating installation methods are more adaptable, but suitability depends on both the material and the condition of the subfloor.
How do I know if my subfloor is ready for flooring installation?
▼A subfloor is ready when it is clean, structurally sound, level within tolerance, and dry. Moisture testing is essential, as surface appearance alone is not a reliable indicator.